
I run k3s in my homelab, and I wanted to expose my apps to the internet without opening multiple ports or configuring complex router rules.
I had the options of NodePort or installing MetalLB. Although both approaches work, neither felt close to how things are done in production. NodePort would mean exposing a port on my router and mapping it to a node. That exposes my public IP and opens inbound traffic into my network. MetalLB is cleaner inside Kubernetes, but it still assumes you have public IP handling and proper routing at the edge.
What I wanted instead was something closer to how modern infrastructure works, that supports encrypted transport, no inbound ports, and clean DNS control.
That is why I chose Cloudflare Tunnel. The goal for me was to use my domain demolamalomo.xyz registered on AWS Route 53. I wanted something very close to production that caters to the following:
- Apps accessible at
*.demolamalomo.xyz(e.g.,whoami.demolamalomo.xyz,grafana.demolamalomo.xyz) - No router port forwarding
- No public IP exposure
- Cloudflared running as Kubernetes pods, not installed on the host
##Step 1: Move the Domain to Cloudflare DNS
My first instinct was to delegate only a subdomain like k3s.demolamalomo.xyz to Cloudflare using NS records in Route 53. That way my root domain stays fully in Route 53 and only the Kubernetes subdomain gets managed by Cloudflare.
That didn’t work. Cloudflare's free plan does not support adding subdomain zones. You can only add root domains like demolamalomo.yxz. On testing, this didn’t work because anytime I dig through the nameserver, the nameservers returned are still the ones tied to Route 53.
So I moved the entire domain's DNS to Cloudflare by following the steps below:
- In the Cloudflare Dashboard, I clicked the + Add button, selected the Connect a domain option, and filled in the required field.


- Selected the Free plan
- Cloudflare scanned and imported my existing Route 53 DNS records automatically
- Cloudflare assigned me two nameservers similar to
****.**.cloudflare.comand******.**.cloudflare.com
Then I updated Route 53 to point to those nameservers.
The First Mistake: Changing Nameservers in the Wrong Place Route 53 has two places where nameservers appear, and I changed the wrong one.
Wrong place: Route 53 >> Hosted zones >> demolamalomo.xyz >> NS record. This is just a DNS record inside the zone. Changing it does nothing to where the internet actually looks for your domain. Right place: Route 53 >> Registered domains >> demolamalomo.xyz >> Name servers. This is what tells the TLD registry where to send DNS queries for your domain.
I spent time debugging why dig clohea.net NS @1.1.1.1 still returned AWS nameservers before realizing I had changed the wrong thing. Once I updated the registered domain's nameservers, Cloudflare showed the domain as Active, and DNS started resolving correctly.
##Step 2: Create the Cloudflare Tunnel
In the Cloudflare Zero Trust dashboard, I created a tunnel following the steps below:
- Navigate to Networks >> Connectors
- Click Create a tunnel
- Select Cloudflared as the connector type

- Named it
k3s-tunnel - On the connector install page, copied the tunnel token starting with
eyJ... - Then, I installed Cloudflared on my machine with the token copied. sudo cloudflared service install eyJ......
Once Cloudflared is installed, the status shows HEALTHY in my dashboard.
Next, I proceeded to the next page to configure the subdomain and service (Traefik in my case)

##Step 3: Deploy Cloudflared on Kubernetes
I chose to run cloudflared as Kubernetes pods rather than installing it on the host machine. This keeps everything inside the cluster and makes it easy to manage with standard Kubernetes tooling.
To do this, first, I created a namespace and stored the tunnel token I got earlier as a secret:
kubectl create namespace cloudflare

kubectl create secret generic cloudflared-token \
  --namespace cloudflare \
  --from-literal=token=<TUNNEL_TOKEN>
Then, I used the secret to create a deployment:
apiVersion: apps/v1
kind: Deployment
metadata:
    name: cloudflared
    namespace: cloudflare
spec:
    replicas: 2
    selector:
        matchLabels:
            app: cloudflared
    template:
        metadata:
            labels:
                app: cloudflared
        spec:
            containers:
                - name: cloudflared
                  image: cloudflare/cloudflared:latest
                  args:
                      - tunnel
                      - --no-autoupdate
                      - run
                  env:
                      - name: TUNNEL_TOKEN
                        valueFrom:
                            secretKeyRef:
                                name: cloudflared-token
                                key: token
                  resources:
                      requests:
                          memory: '128Mi'
                          cpu: '100m'
                      limits:
                          memory: '256Mi'
                          cpu: '200m'
This creates two replicas of the cloudflared instance, and the TUNNEL_TOKEN environment variable tells cloudflared to run in remotely-managed mode (the tunnel configuration lives in Cloudflare's dashboard, not in a local config file).
After applying, I verified the pods were connected:
kubectl logs -n cloudflare -l app=cloudflared --tail=20I saw Registered tunnel connection messages with protocol=quic, confirming the tunnel was live.
##Step 4: Deploy a Test App
I deployed the traefik/whoami image as a simple test:
apiVersion: apps/v1
kind: Deployment
metadata:
    name: whoami
    namespace: default
spec:
    replicas: 1
    selector:
        matchLabels:
            app: whoami
    template:
        metadata:
            labels:
                app: whoami
        spec:
            containers:
                - name: whoami
                  image: traefik/whoami:latest
                  ports:
                      - containerPort: 80
---
apiVersion: v1
kind: Service
metadata:
    name: whoami
    namespace: default
spec:
    selector:
        app: whoami
    ports:
        - port: 80
          targetPort: 80
Also added the Ingress rule telling Traefik how to route based on the Host header:
apiVersion: networking.k8s.io/v1
kind: Ingress
metadata:
    name: whoami-ingress
    namespace: default
spec:
    rules:
        - host: whoami.demolamalomo.xyz
          http:
              paths:
                  - path: /
                    pathType: Prefix
                    backend:
                        service:
                            name: whoami
                            port:
                                number: 80
The 502 Problem
At this point, I expected everything to work with the DNS resolved. The tunnel was connected. But when I hit https://whoami.demolamalomo.xyz, I got a 502 Bad Gateway from Cloudflare.
This was the most confusing problem because:
- The cloudflared pods were healthy and connected
- The tunnel logs showed no request-level errors
- From a debug pod inside the cluster, curling
http://traefik.kube-system.svc.cluster.local:80with the correct Host header returned a perfect 200 response
The issue was DNS resolution inside the cloudflared container. My tunnel config originally pointed to:
http://traefik.kube-system.svc.cluster.local:80The cloudflared Docker image is built on scratch, an essentially empty container with nothing but the cloudflared binary, with no shell, cat , curl , or /etc/resolv.conf. When cloudflared tried to resolve traefik.kube-system.svc.cluster.local, it had no idea which DNS server to ask and failed silently. The request never reached Traefik, so Cloudflare returned a 502.
I confirmed this by switching the tunnel config to use Traefik's ClusterIP directly:
http://10.43.250.137:80Immediately, I ran curl https://whoami.clohea.net , and it returned the whoami response with Cloudflare headers confirming traffic was flowing through the tunnel.
Why the ClusterIP Approach Is Fine In a homelab, the Traefik service ClusterIP is stable. It only changes if you delete and recreate the service. For a more robust solution, you could add explicit DNS config to the cloudflared deployment:
spec:
    template:
        spec:
            dnsPolicy: 'ClusterFirst'
            dnsConfig:
                nameservers:
                    - 10.43.0.10 # kube-dns ClusterIP
                searches:
                    - kube-system.svc.cluster.local
                    - svc.cluster.local
                    - cluster.local
But for a homelab, the ClusterIP approach is simpler and works.
Adding New Apps
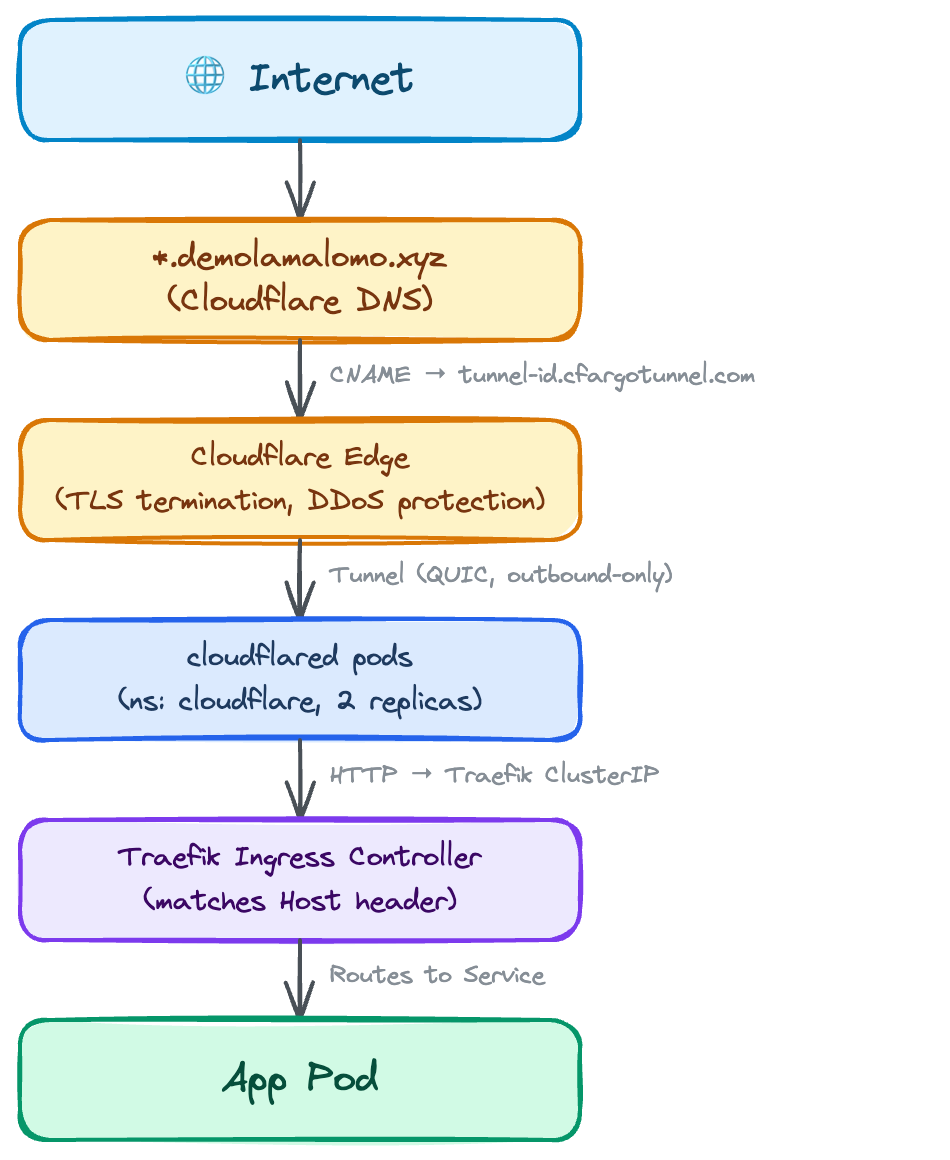
The best part about this setup is that adding a new app requires zero changes to Cloudflare. The wildcard *.demolamalomo.xyz already covers every subdomain. I just need to:
- A Deployment and Service for my app
- An Ingress with the right hostname
The architecture looks like this:
##Lessons Learned
- Route 53 has two places for nameservers. The hosted zone NS record is not the same as the registered domain's nameserver setting. Change the wrong one and nothing happens. Change it under Registered domains >> Name servers.
- The Cloudflared Docker image cannot resolve Kubernetes DNS names. It is built on a scratch base image with no
/etc/resolv.conf. Either use the target service's ClusterIP directly or add explicitdnsConfigto the pod spec. - Ingress host names must match exactly. If your tunnel routes to
*.clohea.netbut your Ingress sayswhoami.k3s.clohea.net, Traefik will not match the request and you will get a 502.