
Xata is a serverless data platform for building modern and robust applications. Built on top of PostgreSQL, Xata provides a unified REST API for efficient data management. Setting itself apart from other data platforms, Xata introduces unique functionalities that significantly streamline the developer workflow. Here are some key benefits of integrating Xata into any application:
- Robust file management: Xata provides APIs and SDKs to manage and securely upload images, documents, and more, directly to a database record.
- Multiple environments support and workflow: With Xata, creating isolated production environments for testing, staging, or feature releases is seamless.
- Fast search support: Xata automatically indexes uploaded data, facilitating fast and efficient data searches across tables and branches.
- AI support: Xata offers vector embedding and AI solutions that empower the development of intelligent applications.
To experience the capabilities of Xata, we will build a project management application with Xata and Flutter. The project repository can be found here.
##Prerequisites
To follow along with this tutorial, the following are needed:
- Basic understanding of Dart and Flutter
- Xata account. Signup is free
##Setup the database on Xata
To get started, log into the Xata workspace and create a project database. Inside the project database, create a Project table and add columns as shown below:
| Column type | Column name |
|---|---|
| String | name |
| Text | description |
| String | status |


Inside a table, Xata automatically adds an id, xata.createdAt, xata.updatedAt, and xata.version columns that we can also leverage to perform advanced data operations.

Get the Database URL and set up the API Key
To securely connect to the database, Xata provides a unique and secure URL for accessing it. To get the database URL, click the Get code snippet button and copy the URL. Then click the API Key link, add a new key, save and copy the API key.


We must keep the copied URL and API key as they will come in handy when building our application.
##Building the project management application with Xata and Flutter
To get started, we need to clone the project by navigating to the desired directory and running the command below:
git clone https://github.com/Mr-Malomz/flutter_xata.gitRunning the project
We need to install the project dependencies by running the command below:
flutter pub getThen, run the project using the following command:
flutter run
The command above will run the application on the selected device.


Setup environment variable
Next, we must add our database URL and API key as an environment variable. To do this, create .env file in the root directory and add the copied URL and API key.
XATA_DATABASE_URL= <REPLACE WITH THE COPIED DATABASE URL>
XATA_API_KEY=<REPLACE WITH THE COPIED API KEY>
Create the API models
To represent the application data, we need to create a utils.dart file in the lib folder and add the snippet below. The model will cater to converting the response sent from the JSON response to a Dart object and JSON serialization
class Project {
  String? id;
  String name;
  String description;
  String status;

  Project({
    this.id,
    required this.name,
    required this.description,
    required this.status,
  });

  Map<dynamic, dynamic> toJson() {
    return {
      "name": name,
      "description": description,
      "status": status,
    };
  }

  factory Project.fromJson(Map<dynamic, dynamic> json) {
    return Project(
      id: json['id'],
      name: json['name'],
      description: json['description'],
      status: json['status'],
    );
  }
}
Create a service
With that done, we need to create a service file to separate the application core logic from the UI. To do this, create a xata_service.dart file inside the lib directory. Then, add the snippet below:
import 'package:dio/dio.dart';
import 'package:flutter_dotenv/flutter_dotenv.dart';
import 'package:flutter_xata/utils.dart';

class XataService {
  final _dio = Dio();
  static String _apiKey = dotenv.get("XATA_API_KEY");
  static String _baseURL = dotenv.get("XATA_DATABASE_URL");

  final _headers = {
    "content-type": "application/json",
    "AUTHORIZATION": "Bearer $_apiKey",
  };

  Future<List<Project>> getProjects() async {
    var response = await _dio.post(
      "$_baseURL:main/tables/Project/query",
      options: Options(headers: _headers),
    );

    if (response.statusCode == 200) {
      var respList = response.data['records'] as List;
      var projectList = respList.map((json) => Project.fromJson(json)).toList();
      return projectList;
    } else {
      throw Exception('Error getting projects');
    }
  }

  Future<Project> getSingleProject(String id) async {
    var response = await _dio.get(
      "$_baseURL:main/tables/Project/data/$id",
      options: Options(headers: _headers),
    );

    if (response.statusCode == 200) {
      var resp = response.data;
      var project = Project.fromJson(resp);
      return project;
    } else {
      throw Exception('Error getting project');
    }
  }

  Future createProject(Project newProject) async {
    var response = await _dio.post(
      "$_baseURL:main/tables/Project/data",
      options: Options(headers: _headers),
      data: newProject.toJson(),
    );

    if (response.statusCode == 201) {
      return response.data;
    } else {
      throw Exception('Error creating project');
    }
  }

  Future updateProject(String id, Project updatedProject) async {
    var response = await _dio.put(
      "$_baseURL:main/tables/Project/data/$id",
      options: Options(headers: _headers),
      data: updatedProject.toJson(),
    );

    if (response.statusCode == 200) {
      return response.data;
    } else {
      throw Exception('Error updating project');
    }
  }

  Future deleteProject(String id) async {
    var response = await _dio.delete(
      "$_baseURL:main/tables/Project/data/$id",
      options: Options(headers: _headers),
    );

    if (response.statusCode == 204) {
      return response.data;
    } else {
      throw Exception('Error deleting project');
    }
  }
}
The snippet above does the following:
- Imports the required dependencies
- Creates an
XataServiceclass with_apiKey,_baseURL, and_headersproperties to connect to the Xata instance - Creates a
getProjects,getSingleProject,createProject,updateProject, anddeleteProjectmethod that uses the_storageproperty to get, save, and preview images
Consuming the service
With that done, we can use the service to perform the required operation.
Get all projects
To get started, we need to modify the home.dart file in the screens directory and update it by doing the following:
First, we need to import the required dependencies and create a method to get the list of projects saved in the database:
//Other imports goes here
import 'package:flutter_xata/utils.dart';
import 'package:flutter_xata/xata_service.dart';
class Home extends StatefulWidget {
const Home({super.key});
State<Home> createState() => _HomeState();
}
class _HomeState extends State<Home> {
late List<Project> projects;
bool _isLoading = false;
bool _isError = false;
void initState() {
getProjects();
super.initState();
}
getProjects() {
setState(() {
_isLoading = true;
});
XataService().getProjects().then((value) {
setState(() {
projects = value;
_isLoading = false;
});
}).catchError((onError) {
setState(() {
_isLoading = false;
_isError = true;
});
});
}
Widget build(BuildContext context) {
//UI CODE GOES HERE
}
}The snippet above does the following:
- Imports the required dependencies
- Lines 12-14: Creates the
projects,_isLoading, and_isErrorproperties to manage the application state - Lines 16-37: Creates a
getProjectsmethod to get the list of available projects on the database using theXataService().getProjectsand set states accordingly
Lastly, we need to modify the UI to use the states and method created to get the projects list.
//imports goes here
class Home extends StatefulWidget {
//code goes here
}
class _HomeState extends State<Home> {
//states goes here
void initState() {
//code goes here
}
getProjects() {
//code goes here
}
Widget build(BuildContext context) {
return _isLoading
? const Center(
child: CircularProgressIndicator(
color: Colors.blue,
))
: _isError
? const Center(
child: Text(
'Error getting projects',
style: TextStyle(
color: Colors.red,
fontWeight: FontWeight.bold,
),
),
)
: Scaffold(
appBar: AppBar(
title: const Text('Projects',
style: TextStyle(color: Colors.white)),
backgroundColor: Colors.black,
),
body: ListView.builder(
itemCount: projects.length,
itemBuilder: (context, index) {
return InkWell(
onTap: () {
Navigator.push(
context,
MaterialPageRoute(
builder: (context) =>
Detail(id: projects[index].id as String),
),
);
},
child: Container(
decoration: const BoxDecoration(
border: Border(
bottom: BorderSide(width: .5, color: Colors.grey),
),
),
padding: EdgeInsets.fromLTRB(10, 20, 10, 20),
child: Row(
mainAxisAlignment: MainAxisAlignment.spaceEvenly,
children: [
Expanded(
flex: 7,
child: Column(
crossAxisAlignment: CrossAxisAlignment.start,
children: [
Text(
projects[index].name,
style: TextStyle(
color: Colors.black,
fontWeight: FontWeight.w800),
),
const SizedBox(height: 10.0),
Row(
children: [
Icon(projects[index].status == "Started"
? Icons.start
: Icons.stop_circle_outlined),
const SizedBox(width: 5.0),
Text(projects[index].status)
],
),
const SizedBox(height: 10.0),
Text(projects[index].description)
],
),
),
const Column(
crossAxisAlignment: CrossAxisAlignment.end,
children: [
SizedBox(height: 10.0),
Icon(Icons.arrow_forward_ios_rounded)
],
),
],
),
),
);
},
),
floatingActionButton: FloatingActionButton(
onPressed: () {
Navigator.push(
context,
MaterialPageRoute(
builder: (context) => const Create(),
),
);
},
backgroundColor: Colors.black,
tooltip: 'Create project',
child: const Icon(
Icons.add,
color: Colors.white,
),
),
);
}
}Create project
To create a project, we need to modify the create.dart file in the screen directory and update it by doing the following:
First, we need to import the required dependency and create a method to save the project to the database:
//other import goes here
import 'package:flutter_xata/screens/home.dart';
import 'package:flutter_xata/utils.dart';
import 'package:flutter_xata/xata_service.dart';
class Create extends StatefulWidget {
const Create({
Key? key,
}) : super(key: key);
State<Create> createState() => _CreateState();
}
class _CreateState extends State<Create> {
final _formKey = GlobalKey<FormState>();
var _selected = '';
var _dropdownItems = ["Started", "Not_Started"];
final TextEditingController _name = TextEditingController();
final TextEditingController _description = TextEditingController();
bool _isLoading = false;
createProject() {
setState(() {
_isLoading = true;
});
Project newProject = Project(
name: _name.text,
description: _description.text,
status: _selected,
);
XataService().createProject(newProject).then((value) {
setState(() {
_isLoading = false;
});
ScaffoldMessenger.of(context).showSnackBar(
const SnackBar(content: Text('Project created successfully!')),
);
Navigator.push(
context,
MaterialPageRoute(builder: (context) => const Home()),
);
}).catchError((onError) {
setState(() {
_isLoading = false;
});
ScaffoldMessenger.of(context).showSnackBar(
const SnackBar(content: Text('Error creating project!')),
);
});
}
Widget build(BuildContext context) {
//UI CODE GOES HERE
}
}The snippet above does the following:
- Import the required dependencies
- Lines 18-20: Creates the
_name,_description, and_isLoadingproperties to manage the application state - Lines 22-52: Creates a
createProjectmethod to save the project using theXataService().createProjectservice, set states accordingly
Lastly, we need to modify the UI to use the method and states created to process the form.
//import goes here
class Create extends StatefulWidget {
//code goes here
}
class _CreateState extends State<Create> {
//states goes here
createProject() {
//code goes here
}
Widget build(BuildContext context) {
return Scaffold(
appBar: AppBar(
title:
const Text("Create project", style: TextStyle(color: Colors.white)),
backgroundColor: Colors.black,
iconTheme: const IconThemeData(color: Colors.white),
),
body: Padding(
padding: const EdgeInsets.symmetric(horizontal: 16.0, vertical: 30.0),
child: Form(
key: _formKey,
child: Column(
children: [
Column(
crossAxisAlignment: CrossAxisAlignment.start,
children: [
Column(
crossAxisAlignment: CrossAxisAlignment.start,
children: [
const Text(
'Name',
style: TextStyle(
color: Colors.grey,
fontSize: 14.0,
),
),
const SizedBox(height: 5.0),
TextFormField(
controller: _name,
validator: (value) {
if (value == null || value.isEmpty) {
return 'Please input name';
}
return null;
},
decoration: InputDecoration(
contentPadding: const EdgeInsets.symmetric(
vertical: 10, horizontal: 20),
hintText: "input name",
fillColor: Colors.white,
focusedBorder: OutlineInputBorder(
borderRadius: BorderRadius.circular(10),
borderSide: const BorderSide(color: Colors.grey),
),
enabledBorder: OutlineInputBorder(
borderRadius: BorderRadius.circular(10),
borderSide: const BorderSide(color: Colors.grey),
),
errorBorder: OutlineInputBorder(
borderRadius: BorderRadius.circular(10),
borderSide: const BorderSide(color: Colors.red),
),
),
keyboardType: TextInputType.text,
maxLines: null,
),
const SizedBox(height: 30.0),
const Text(
'Status',
style: TextStyle(
color: Colors.grey,
fontSize: 14.0,
),
),
const SizedBox(height: 5.0),
DropdownButtonFormField(
items: _dropdownItems.map((String item) {
return DropdownMenuItem(
value: item,
child: Text(item),
);
}).toList(),
onChanged: (value) {
setState(() => _selected = value!);
},
decoration: InputDecoration(
contentPadding: const EdgeInsets.symmetric(
vertical: 10, horizontal: 20),
hintText: "select status",
focusedBorder: OutlineInputBorder(
borderRadius: BorderRadius.circular(10),
borderSide: const BorderSide(color: Colors.grey),
),
enabledBorder: OutlineInputBorder(
borderRadius: BorderRadius.circular(10),
borderSide: const BorderSide(color: Colors.grey),
),
errorBorder: OutlineInputBorder(
borderRadius: BorderRadius.circular(10),
borderSide: const BorderSide(color: Colors.red),
),
),
),
const SizedBox(height: 30.0),
const Text(
'Description',
style: TextStyle(
color: Colors.grey,
fontSize: 14.0,
),
),
const SizedBox(height: 5.0),
TextFormField(
controller: _description,
validator: (value) {
if (value == null || value.isEmpty) {
return 'Please input ydescription';
}
return null;
},
maxLines: 5,
decoration: InputDecoration(
contentPadding: const EdgeInsets.symmetric(
vertical: 10, horizontal: 20),
hintText: "input description",
fillColor: Colors.white,
focusedBorder: OutlineInputBorder(
borderRadius: BorderRadius.circular(10),
borderSide: const BorderSide(color: Colors.grey),
),
enabledBorder: OutlineInputBorder(
borderRadius: BorderRadius.circular(10),
borderSide: const BorderSide(color: Colors.grey),
),
errorBorder: OutlineInputBorder(
borderRadius: BorderRadius.circular(10),
borderSide: const BorderSide(color: Colors.red),
),
),
keyboardType: TextInputType.multiline,
),
],
),
],
),
const SizedBox(height: 30.0),
SizedBox(
height: 45,
width: double.infinity,
child: TextButton(
onPressed: _isLoading
? null
: () {
if (_formKey.currentState!.validate()) {
createProject();
}
},
style: ButtonStyle(
backgroundColor:
MaterialStateProperty.all<Color>(Colors.black),
),
child: const Text(
'Create project',
style: TextStyle(
color: Colors.white,
fontWeight: FontWeight.bold,
fontSize: 14.0,
),
),
),
),
],
),
),
),
);
}
}Get a project, edit a project and delete project
To perform the stated operations in our application, we need to modify the detail.dart file in the screens directory and update it by doing the following:
First, we need to import the required dependencies and create methods to get, edit, and delete projects.
//import goee here
import 'package:flutter_xata/screens/home.dart';
import 'package:flutter_xata/utils.dart';
import 'package:flutter_xata/xata_service.dart';
class Detail extends StatefulWidget {
const Detail({Key? key, required this.id}) : super(key: key);
final String id;
State<Detail> createState() => _DetailState();
}
class _DetailState extends State<Detail> {
final _formKey = GlobalKey<FormState>();
var _selected = '';
var _dropdownItems = ["Started", "Not_Started"];
final TextEditingController _name = TextEditingController();
final TextEditingController _description = TextEditingController();
bool _isLoading = false;
bool _isSubmitting = false;
bool _isError = false;
void initState() {
getSingleProject();
super.initState();
}
getSingleProject() {
setState(() {
_isLoading = true;
});
XataService().getSingleProject(widget.id).then((value) {
setState(() {
_isLoading = false;
});
_name.text = value.name;
_description.text = value.description;
_selected = value.status;
}).catchError((onError) {
setState(() {
_isLoading = false;
_isError = true;
});
});
}
updateProject() {
setState(() {
_isSubmitting = true;
});
Project updatedProject = Project(
name: _name.text,
description: _description.text,
status: _selected,
);
XataService().updateProject(widget.id, updatedProject).then((value) {
setState(() {
_isSubmitting = false;
});
ScaffoldMessenger.of(context).showSnackBar(
const SnackBar(content: Text('Project updated successfully!')),
);
Navigator.push(
context,
MaterialPageRoute(builder: (context) => const Home()),
);
}).catchError((onError) {
setState(() {
_isSubmitting = false;
_isError = true;
});
ScaffoldMessenger.of(context).showSnackBar(
const SnackBar(content: Text('Error updating project!')),
);
});
}
deleteProject() {
setState(() {
_isSubmitting = true;
});
XataService().deleteProject(widget.id).then((value) {
setState(() {
_isSubmitting = false;
});
ScaffoldMessenger.of(context).showSnackBar(
const SnackBar(content: Text('Project deleted successfully!')),
);
Navigator.push(
context,
MaterialPageRoute(builder: (context) => const Home()),
);
}).catchError((onError) {
setState(() {
_isSubmitting = false;
_isError = true;
});
ScaffoldMessenger.of(context).showSnackBar(
const SnackBar(content: Text('Error deleting project!')),
);
});
}
Widget build(BuildContext context) {
//UI CODE GOES HERE
}
}The snippet above does the following:
- Import the required dependencies
- Lines 17-21: Creates the
_name,_description,_isLoading,_isSubmitting, and_isErrorproperties to manage the application state - Lines 23-103: Creates the
getSingleProject,updateProject, anddeleteProjectmethods to retrieve details of the selected project, update it, and delete it using theXataService().getSingleProject,XataService().updateProject, andXataService().deleteProjectservices, respectively. Set states accordingly.
Lastly, we need to modify the UI to use the methods and states created to process the operations.
//imports goes here
class Detail extends StatefulWidget {
//code goes here
}
class _DetailState extends State<Detail> {
//state goes here
void initState() {
//code goes here
}
getSingleProject() {
//code goes here
}
updateProject() {
//code goes here
}
deleteProject() {
//code goes here
}
Widget build(BuildContext context) {
return _isLoading
? const Center(
child: CircularProgressIndicator(
color: Colors.blue,
))
: _isError
? const Center(
child: Text(
'Error getting project,
style: TextStyle(
color: Colors.red,
fontWeight: FontWeight.bold,
),
),
)
: Scaffold(
appBar: AppBar(
title: const Text("Details",
style: TextStyle(color: Colors.white)),
backgroundColor: Colors.black,
iconTheme: const IconThemeData(color: Colors.white),
),
body: Padding(
padding: const EdgeInsets.symmetric(
horizontal: 16.0, vertical: 30.0),
child: Form(
key: _formKey,
child: Column(
children: [
Column(
crossAxisAlignment: CrossAxisAlignment.start,
children: [
Column(
crossAxisAlignment: CrossAxisAlignment.start,
children: [
const Text(
'Name',
style: TextStyle(
color: Colors.grey,
fontSize: 14.0,
),
),
const SizedBox(height: 5.0),
TextFormField(
controller: _name,
validator: (value) {
if (value == null || value.isEmpty) {
return 'Please input name';
}
return null;
},
decoration: InputDecoration(
contentPadding: const EdgeInsets.symmetric(
vertical: 10, horizontal: 20),
hintText: "input name",
fillColor: Colors.white,
focusedBorder: OutlineInputBorder(
borderRadius: BorderRadius.circular(10),
borderSide:
const BorderSide(color: Colors.grey),
),
enabledBorder: OutlineInputBorder(
borderRadius: BorderRadius.circular(10),
borderSide:
const BorderSide(color: Colors.grey),
),
errorBorder: OutlineInputBorder(
borderRadius: BorderRadius.circular(10),
borderSide:
const BorderSide(color: Colors.red),
),
),
keyboardType: TextInputType.text,
maxLines: null,
),
const SizedBox(height: 30.0),
const Text(
'Status',
style: TextStyle(
color: Colors.grey,
fontSize: 14.0,
),
),
const SizedBox(height: 5.0),
DropdownButtonFormField(
value: _selected,
items: _dropdownItems.map((String item) {
return DropdownMenuItem(
value: item,
child: Text(item),
);
}).toList(),
onChanged: (value) {
setState(() => _selected = value!);
},
decoration: InputDecoration(
contentPadding: const EdgeInsets.symmetric(
vertical: 10, horizontal: 20),
hintText: "select status",
focusedBorder: OutlineInputBorder(
borderRadius: BorderRadius.circular(10),
borderSide:
const BorderSide(color: Colors.grey),
),
enabledBorder: OutlineInputBorder(
borderRadius: BorderRadius.circular(10),
borderSide:
const BorderSide(color: Colors.grey),
),
errorBorder: OutlineInputBorder(
borderRadius: BorderRadius.circular(10),
borderSide:
const BorderSide(color: Colors.red),
),
),
),
const SizedBox(height: 30.0),
const Text(
'Description',
style: TextStyle(
color: Colors.grey,
fontSize: 14.0,
),
),
const SizedBox(height: 5.0),
TextFormField(
controller: _description,
validator: (value) {
if (value == null || value.isEmpty) {
return 'Please input ydescription';
}
return null;
},
maxLines: 5,
decoration: InputDecoration(
contentPadding: const EdgeInsets.symmetric(
vertical: 10, horizontal: 20),
hintText: "input description",
fillColor: Colors.white,
focusedBorder: OutlineInputBorder(
borderRadius: BorderRadius.circular(10),
borderSide:
const BorderSide(color: Colors.grey),
),
enabledBorder: OutlineInputBorder(
borderRadius: BorderRadius.circular(10),
borderSide:
const BorderSide(color: Colors.grey),
),
errorBorder: OutlineInputBorder(
borderRadius: BorderRadius.circular(10),
borderSide:
const BorderSide(color: Colors.red),
),
),
keyboardType: TextInputType.multiline,
),
],
),
],
),
const SizedBox(height: 30.0),
SizedBox(
height: 45,
width: double.infinity,
child: TextButton(
onPressed: _isSubmitting
? null
: () {
if (_formKey.currentState!.validate()) {
updateProject();
}
},
style: ButtonStyle(
backgroundColor: MaterialStateProperty.all<Color>(
Colors.black),
),
child: const Text(
'Update project',
style: TextStyle(
color: Colors.white,
fontWeight: FontWeight.bold,
fontSize: 14.0,
),
),
),
),
],
),
),
),
floatingActionButton: FloatingActionButton(
onPressed: _isSubmitting
? null
: () {
deleteProject();
},
backgroundColor: Colors.red,
tooltip: 'Delete',
child: const Icon(
Icons.delete,
color: Colors.white,
),
),
);
}
}With that done, we restart the application using the code editor or run the command below:
flutter run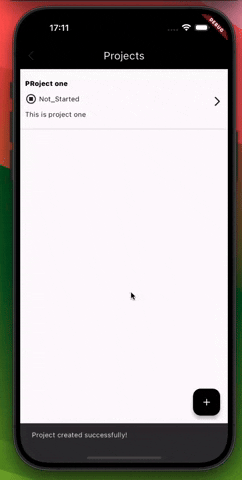
##Conclusion
This post discussed how to build a basic project management application with Xata and Flutter. In addition to the functionalities explored earlier, Xata also includes well-tailored features that developers can harness to build applications ranging from small to large.
These resources may also be helpful: