

A product delivery page shows relevant product details like images, size, colour, price, reviews, etc. It is an essential marketing strategy used to show relevant information that converts leads to sales.
In this post, we will learn how to build a product delivery page using Cloudinary for media optimization, Uniform for composing experience, and Yew; a Rust-based frontend framework for rendering the product markup.
##Prerequisites
To fully grasp the concepts presented in this tutorial, the following requirements apply:
- Basic understanding of Rust
- Trunk and Wasm32 installed
- Cloudinary account (create an account here)
- Uniform account (create an account here)
##Getting started
Before we dive into building our application, it is paramount we understand the layout of our application. It will serve as a foundation for modelling the products with Cloudinary and Uniform.

In this post, we will focus on modelling the flower components with Cloudinary and Uniform.
Image Sourcing and Upload to Cloudinary
To start building our application, we must upload sample images for our product delivery page.
Sample images
- Rose flower - https://bit.ly/3tdOXHz
- Hibiscus flower - https://bit.ly/3zYQ0yJ
- Orchid flower - https://bit.ly/3UJMmB3
- Tulip flower - https://bit.ly/3fQ3XrW
In our Cloudinary dashboard, we uploaded the images by clicking on the Media Library tab, clicking on Upload, selecting the Web Address option, inputting the URL, and clicking on the Arrow Button to upload.


After uploading the image, we will see it displayed on the console.

##Putting it all together on Uniform
With that done, we can start creating component libraries on Uniform. To do this, we must sign up and fill in the required information.
Next, input desired project name and click Continue.

Next, navigate to the Security tab, select API Keys, and click on the rounded Plus Icon to create one. Input marketting_feature as the API name, click on Add to Project, mark all the permissions, and click on Set Permissions. Then click on the Create API Key to create the API key.


With this done, we should see a screen containing our API Key and Project ID. We need to copy these values as they will come in handy when building our application with Yew.

Understanding Components and Compositions on Uniform
Before we continue modelling our project on Uniform, we must understand the features we will be leveraging to achieve this. Components in Uniform application work similarly to those in a Frontend application; it lets us break our application into smaller reusable building blocks with properties, while a Composition is the combination of one or more components. For our project, we will create a flower_component.
Add Cloudinary integration support
Uniform improves the product’s digital experience through integration with an existing system. To connect Cloudinary to our project, we need to navigate to the Projects tab, click on the project, and click on any of the highlighted sections to add integrations to our project.


Search or browse through the available integrations, select the Cloudinary integration, click on the Add to project button, input the Cloudname, API Key and Save.


We can get our Cloud Name and API Key from our Cloudinary dashboard.

Create components
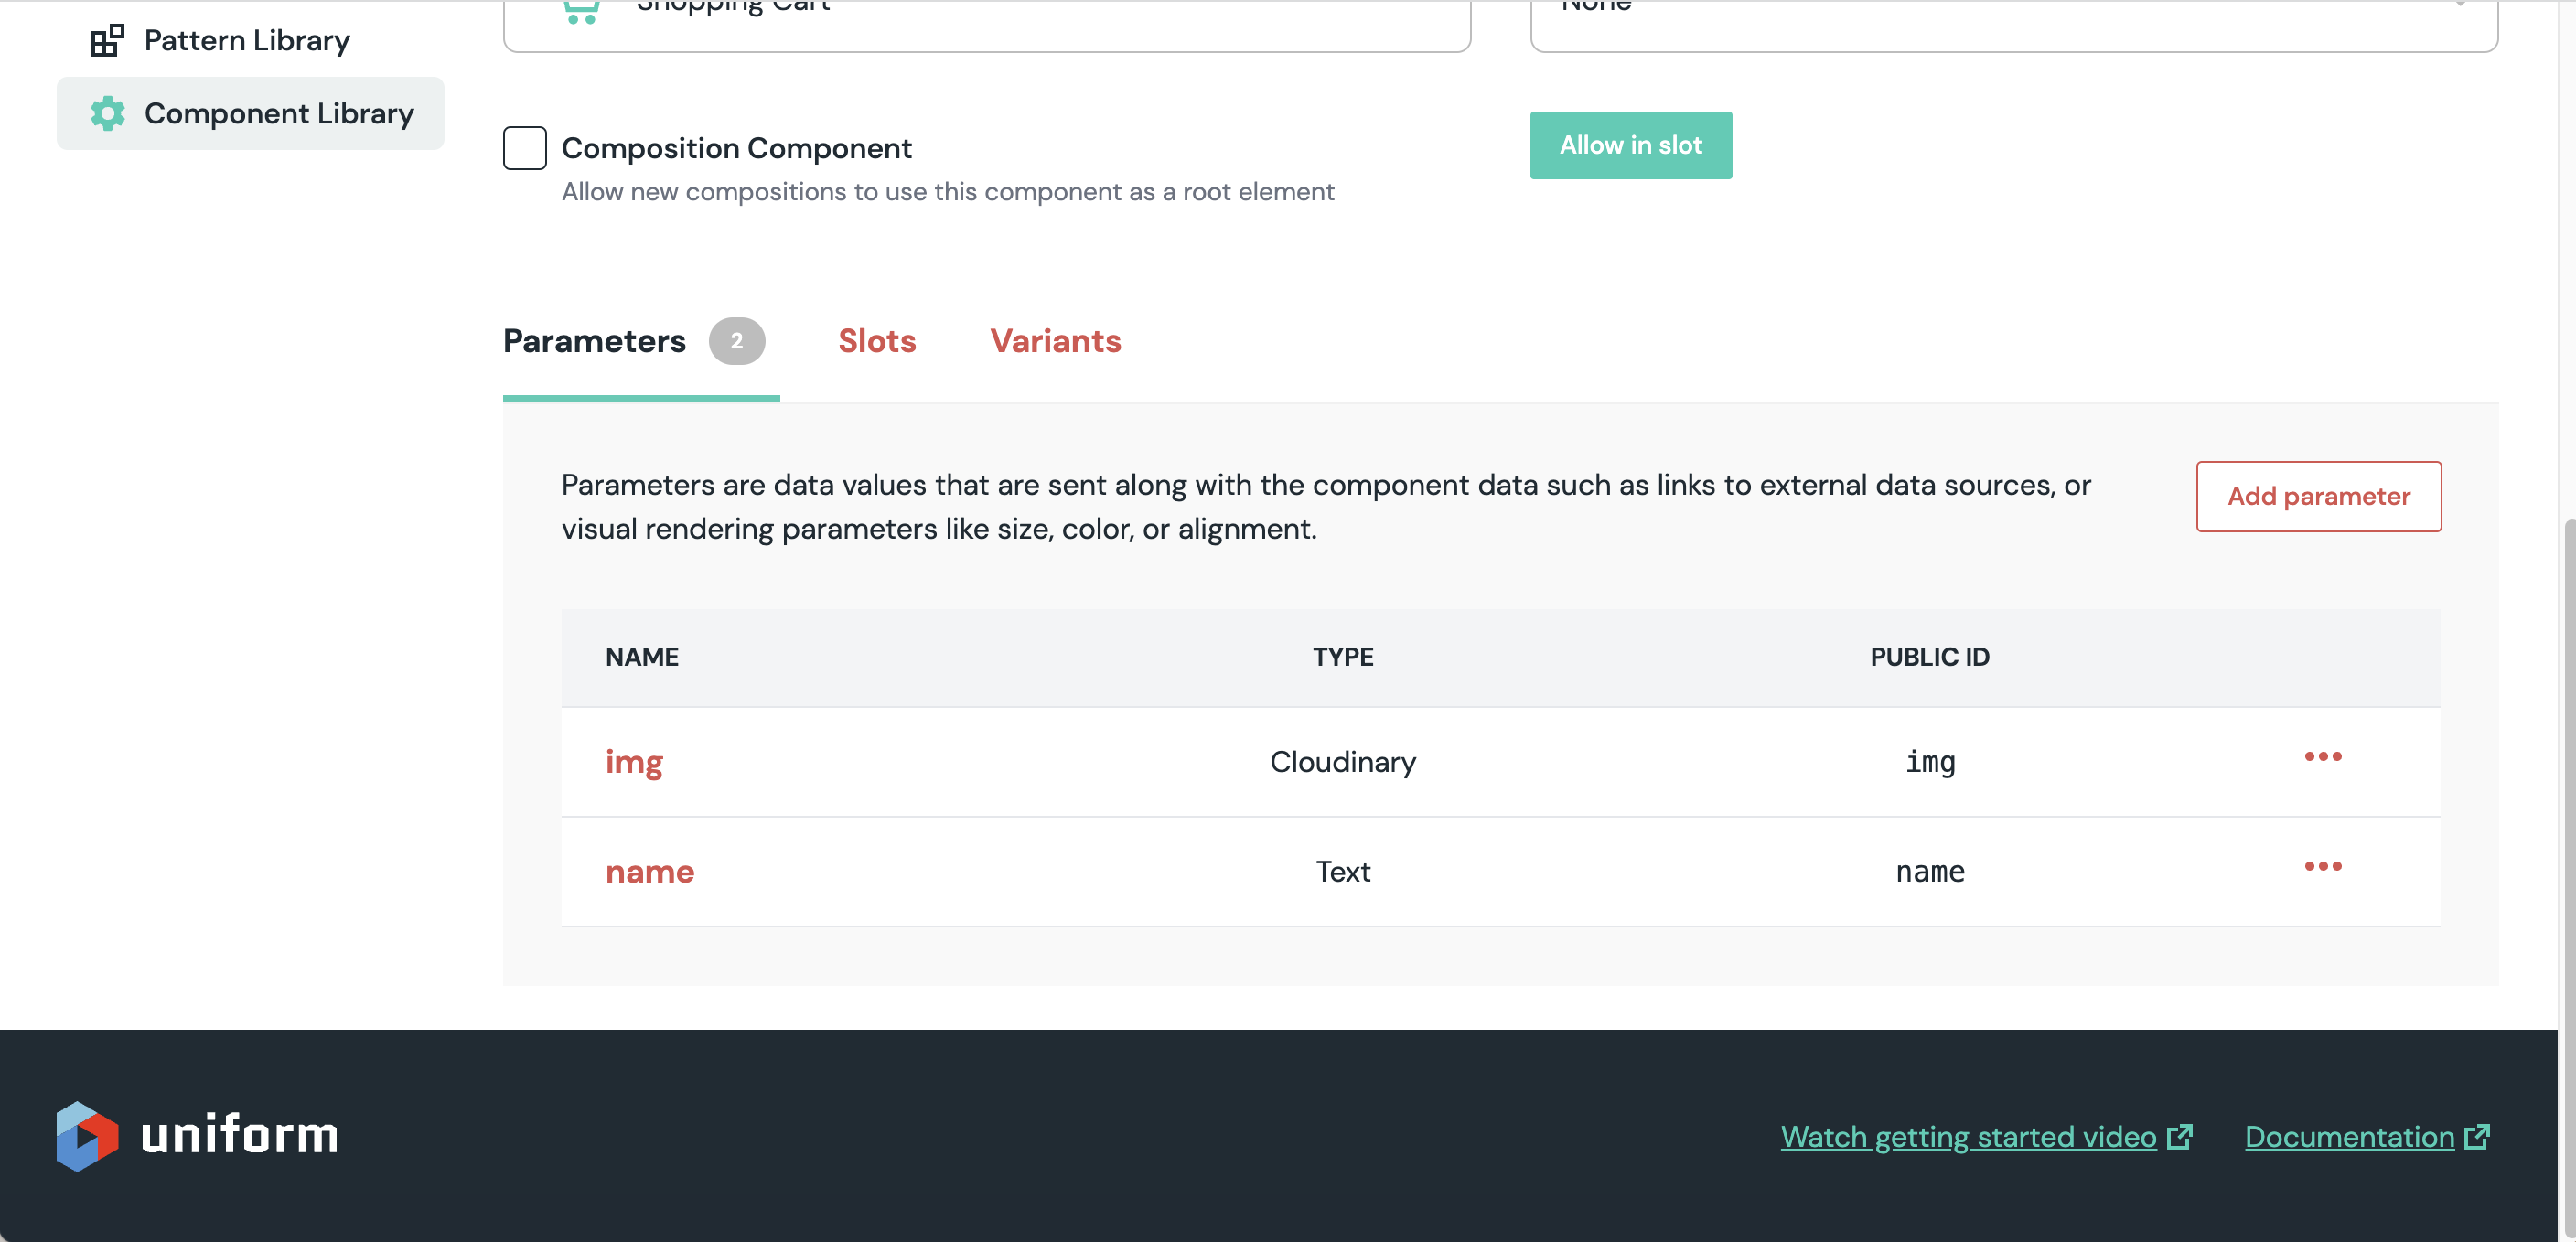
To get started, navigate to the Projects tab and click on the project. Then navigate to the Canvas tab, select the Component Library, and click on the Add component button.

| Parameter Name | Help Text | Type | required |
|---|---|---|---|
| name | product name | text | YES |
| img | product image | Cloudinary |
Input flower_component as the component name, select shopping cart as the icon, add properties of name, and img as shown above, and then click OK.


Then click on the Save and Close button.

Following the same approach, we need to create a body_component and add the properties shown below:
| Parameter Name | Help Text | Type | required |
|---|---|---|---|
| title | title | text | YES |
| description | description | text | YES |


Then click on the Save and Close button.
Now that we have created the flower_component, it will serve as blueprints/building blocks for creating our product delivery page.

To start, click the Plus Icon, input Product Page as the component name, and check the Composition Component. Then navigate to the Slots section, and click on the Plus Icon to create a slot.

PS: Slots help us create instances of our component and allow them to accept data dynamically.
Input Flowers as the Slot Name, select the flower_component as the allowed components, and click OK.

Then click on the Save and Close button.
With that done, we can start using the Product Page component to compose our product delivery page. To do this, navigate to the Composition tab, and click on the Plus Icon to create a composition.

Select the Product Page as the composition type, input Home as the name, and Create.

Input /flowers as the slug and click on the Plus Icon to add a component to map out a new component.

PS: The slug inputted will come in handy when searching for our composition.
Select the flower_component and add the corresponding image and name for the four flowers uploaded to Cloudinary earlier and input matching name.


We need to repeat the steps above to add the remaining flower_component data. Then click on Save and Publish option.


Finally, we need to click on the Publish button. This makes our composition available to third-party applications.

##Building the user interface in Yew
With that done, we can start building the user interface and use Uniform to deliver the list of products seamlessly. To get started, we need to navigate to the desired directory and run the command below in our terminal:
cargo new product-page && cd product-page
This command creates a Rust project called product-page and navigates into the project directory.
Next, we proceed to install the required dependencies by modifying the [dependencies] section of the Cargo.toml file as shown below:
    //other code section goes here

    [dependencies]
    yew = "0.19"
    serde = { version = "1.0.145", features = ["derive"] }
    reqwest = { version = "0.11", features = ["json"] }
    wasm-bindgen-futures = "0.4"
yew = "0.19" is a Rust-based frontend framework
serde = { version = "1.0.145", features = ["derive"] } is a framework for serializing and deserializing Rust data structures. E.g. convert Rust structs to a JSON.
reqwest = { version = "0.11", features = ["json"] } is a HTTP request crate.
wasm-bindgen-futures = "0.4" is a Rust-based library for performing asynchronous programming in Yew by bridging the gap between Rust asynchronous programming (futures) and JavaScript Promises.
We need to run the command below to install the dependencies:
cargo buildHTML Render
With the project dependencies installed, we need to create an index.html file with Bootstrap CDN support in the root directory of our project. Yew uses this file as entry point into the DOM, similarly to the way modern Frontend framework works.
    <!DOCTYPE html>
    <html lang="en">
    <head>
        <meta charset="UTF-8">
        <meta http-equiv="X-UA-Compatible" content="IE=edge">
        <meta name="viewport" content="width=device-width, initial-scale=1.0">
        <link href="https://cdn.jsdelivr.net/npm/bootstrap@5.2.1/dist/css/bootstrap.min.css" rel="stylesheet" integrity="sha384-iYQeCzEYFbKjA/T2uDLTpkwGzCiq6soy8tYaI1GyVh/UjpbCx/TYkiZhlZB6+fzT" crossorigin="anonymous">
        <title>Product Page</title>
    </head>
    <body>
    </body>
    </html>
Structuring our application
To ensure maintainability and scalability, we need to structure our project properly. To do this, we need to navigate to the src folder and create a components and models folder with the corresponding mod.rs file to manage visibility.

To use the code in the modules, we need to declare them as a module and import them into the main.rs file as shown below:
    use yew::prelude::*;

    //add below
    mod components;
    mod models;

    #[function_component(App)]
    fn app() -> Html {
      //app code goes here
    }

    fn main() {
        yew::start_app::<App>();
    }
Creating Application Model
Uniform ships with a language-agnostic Platform API for managing and composing experience. We can test the API by filling in the API Key, Project ID, and Slug.

With that in mind, we can create a product.rs file inside the models folder and add the snippet below:
    use serde::Deserialize;

    #[derive(Clone, Deserialize, PartialEq)]
    pub struct RootComposition {
        pub composition: Composition,
    }

    #[derive(Clone, Deserialize, PartialEq)]
    pub struct Composition {
        pub slots: Slots,
    }

    #[derive(Clone, Deserialize, PartialEq)]
    pub struct Slots {
        pub flowers: Vec<Flower>,
    }

    #[derive(Clone, Deserialize, PartialEq)]
    pub struct Flower {
        pub parameters: Parameters,
    }

    #[derive(Clone, Deserialize, PartialEq)]
    pub struct Parameters {
        pub img: Img,
        pub name: Name,
    }

    #[derive(Clone, Deserialize, PartialEq)]
    pub struct Img {
        pub value: Vec<Value>,
    }

    #[derive(Clone, Deserialize, PartialEq)]
    pub struct Value {
        pub alt: String,
        pub url: String,
    }

    #[derive(Clone, Deserialize, PartialEq)]
    pub struct Name {
        pub value: String,
    }
The snippet above does the following:
- Imports the required dependency
- Creates multiple structs that use the
derivemacro to generate implementation support for formatting the output and deserializing the API response object
Next, we must register the product.rs file as part of the models module. To do this, open the mod.rs in the models folder and add the snippet below:
pub mod product;Creating Components
With the model fully set up, we can start creating our application building blocks.
First, we need to navigate to the components folder and create a header.rs file and add the snippet below:
    use yew::prelude::*;

    #[function_component(Header)]
    pub fn header() -> Html {
        html! {
            <nav class="navbar bg-black">
                <div class="container-fluid">
                    <a class="navbar-brand text-white" href="#">{"Product List"}</a>
                </div>
            </nav>
        }
    }
The snippet above creates a Header component to represent our application header.
Secondly, we need to create a loader.rs file in the same components folder and add the snippet below:
    use yew::prelude::*;

    #[function_component(Loader)]
    pub fn loader() -> Html {
        html! {
        <div class="spinner-border" role="status">
            <span class="visually-hidden">{"Loading..."}</span>
        </div>
        }
    }
The snippet above creates a Loader component representing a UI when our application is loading.
Thirdly, we need to create a message.rs file in the same components folders and add the snippet below:
    use yew::prelude::*;

    #[derive(Properties, PartialEq)]
    pub struct MessageProp {
        pub text: String,
        pub css_class: String,
    }

    #[function_component(Message)]
    pub fn message(MessageProp { text, css_class }: &MessageProp) -> Html {
        html! {
            <p class={css_class.clone()}>
                {text.clone()}
            </p>
        }
    }
The snippet above does the following:
- Imports the required dependency
- Creates a
MessagePropstruct withtextandcss_classproperties to represent the component property. The#[derive(Properties, PartialEq)]macros mark the struct as a component prop - Destructures the props and use them as CSS class and display text in the markup
Fourthly, we need to create a flower_card.rs file in the same components folders and add the snippet below:
    use yew::prelude::*;
    use crate::models::product::Flower;

    #[derive(Properties, PartialEq)]
    pub struct FlowerCardProp {
        pub flower: Flower,
    }

    #[function_component(FlowerCard)]
    pub fn flower_card(FlowerCardProp { flower }: &FlowerCardProp) -> Html {
        let name = flower.parameters.name.value.clone();
        let image_url = flower.parameters.img.value[0].url.clone();
        let image_alt = flower.parameters.img.value[0].alt.clone();

        html! {
            <div class="col-md-6 col-lg-4 col-xl-3 mb-5">
                <div class="card" style="width: 18rem;">
                    <img src={image_url} class="card-img-top" alt={image_alt} />
                    <div class="card-body">
                        <h5 class="card-title">{name}</h5>
                    </div>
                </div>
            </div>
        }
    }
The snippet above does the following:
- Imports the required dependencies
- Creates a
FlowerCardPropcomponent props with aflowerproperty - Destructures the props by creating a copy of the required parameters and using them in the UI
Finally, we must register the newly created components as part of the components module. To do this, open the mod.rs in the components folder and add the snippet below:
    pub mod flower_card;
    pub mod header;
    pub mod loader;
    pub mod message;
Putting it all together
With the application components created, we can start using them to build our application by modifying the main.rs file as shown below:
    use components::{flower_card::FlowerCard, header::Header, loader::Loader, message::Message};
    use models::product::{RootComposition, Slots};
    use reqwest::{header, Client, Error};
    use yew::prelude::*;

    mod components;
    mod models;

    #[function_component(App)]
    fn app() -> Html {
        let flowers: UseStateHandle<Option<Slots>> = use_state(|| None);
        let error: UseStateHandle<Option<Error>> = use_state(|| None);

        {
            //create copies of the states
            let flowers = flowers.clone();
            let error = error.clone();

            //construct uniform api endpoint
            let mut headers = header::HeaderMap::new();
            headers.insert("Content-Type", "application/json".parse().unwrap());
            headers.insert("x-api-key", "<REPLACE WITH API KEY>".parse().unwrap());
            let url = format!(
                "https://uniform.app/api/v1/canvas?projectId={id}&slug={slug}&state=64",
                id = "<REPLACE WITH PROJECT ID>",
                slug = "/flowers"
            );

            use_effect_with_deps(
                move |_| {
                    let client = Client::new();
                    wasm_bindgen_futures::spawn_local(async move {
                        let fetched_flowers = client.get(url).headers(headers).send().await;
                        match fetched_flowers {
                            Ok(response) => {
                                let json = response.json::<RootComposition>().await;
                                match json {
                                    Ok(data) => flowers.set(Some(data.composition.slots)),
                                    Err(e) => error.set(Some(e)),
                                }
                            }
                            Err(e) => error.set(Some(e)),
                        }
                    });
                    || ()
                },
                (),
            );
        }

        let flower_list_logic = match flowers.as_ref() {
            Some(flowers) => flowers
                .flowers
                .iter()
                .map(|flower| {
                    html! {
                        <FlowerCard flower={flower.clone()}/>
                    }
                })
                .collect(),
            None => match error.as_ref() {
                Some(e) => {
                    println!("{}", e);
                    html! {
                        <Message text={"Error getting list of users"} css_class={"text-danger"}/>
                    }
                }
                None => {
                    html! {
                      <Loader />
                    }
                }
            },
        };

        html! {
            <>
                <Header />
                <section class="section-products mt-5">
                    <div class="container">
                        <div class="row justify-content-center text-center">
                            <div class="col-md-8 col-lg-6">
                                <div class="header">
                                    <h5 class="">{"Popular Product List"}</h5>
                                </div>
                            </div>
                        </div>
                        <div class="row">
                            {flower_list_logic}
                        </div>
                    </div>
                </section>
            </>
        }
    }

    fn main() {
        yew::start_app::<App>();
    }
The snippet above does the following:
- Imports the required dependencies
- Line 11 - 12: Creates a
flowersanderrorapplication state by using theuse_statehook and specifyingNoneas the initial value. TheUseStateHandlestruct is used to specify the state type, and theOptionenum represents an optional value - Line 16 - 17: Creates a copy of the states for safe use within the current scope
- Line 20 - 27: Construct a request
urlby adding the API Key, Project ID, and Slug - Line 29 - 49: Uses the
use_effect_with_depshook to perform a side effect of fetching data from the Uniform Platform API asynchronously with thewasm_bindgen_futuresandreqwest'sClientstruct. We also use thematchcontrol flow to match JSON response returned and updates the states accordingly - Line 51 - 74: Creates a
flower_list_logicvariable to abstract our application logic by using thematchcontrol flow to match patterns by doing the following:- Maps through the list of
flowersand pass the individualflowerto theFlowerCardcomponent when the API returns appropriate data - Uses the
MessageandLoadercomponents to match error and loading state, respectively
- Maps through the list of
- Line 76 - 94: Updates the markup with the
Headercomponent andflower_list_logicabstraction
With that done, we can start a development server using the command below:
trunk serve --open
Conclusion
This post discussed how to compose a product delivery page experience with Uniform and Rust.
These resources might be helpful: